ComfyUI FLUX Inpainting
The ComfyUI FLUX Inpainting workflow enables you to restore missing sections, eliminate unwanted elements, and enhance AI-generated images.
admin
8/29/20242 min read


The FLUX models are preloaded on RunComfy under the names `flux/flux-schnell` and `flux/flux-dev`.
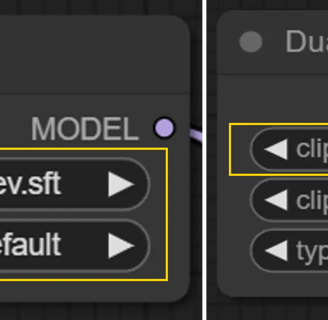
- For Medium-Sized Machines: When launching a RunComfy Medium-Sized Machine, select the checkpoint `flux-schnell, fp8` and clip `t5_xxl_fp8` to prevent out-of-memory issues.
- For Large-Sized Machines and Above: When launching a RunComfy Large-Sized or Above Machine, opt for the larger checkpoint `flux-dev, default` and the higher clip `t5_xxl_fp16`.
How to Use the ComfyUI FLUX Inpainting Workflow for Image Editing
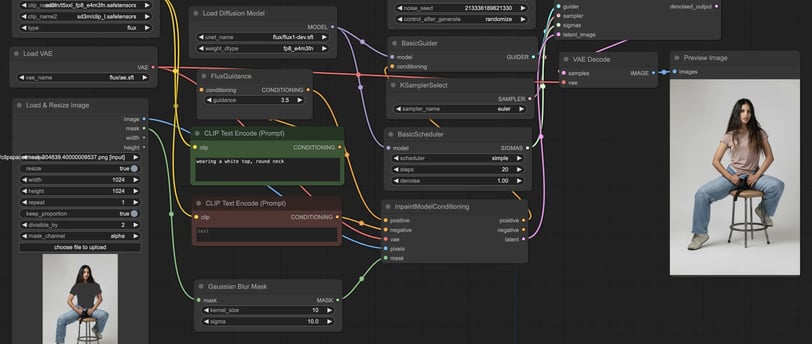
The ComfyUI FLUX Inpainting workflow harnesses the inpainting capabilities of the FLUX models developed by Black Forest Labs. This tool is essential for image editing tasks, enabling you to fill in missing or damaged areas, restore old photographs, remove unwanted objects, and refine AI-generated images. By utilizing advanced image processing techniques, FLUX Inpainting seamlessly integrates newly generated content with the existing image, producing natural and cohesive results.
Step 1: Configure DualCLIPLoader Node
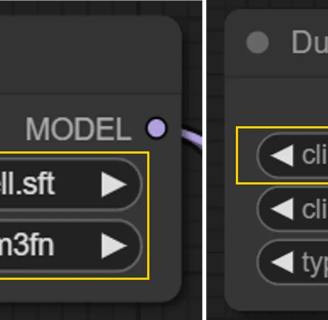
To optimize memory usage when using the ComfyUI FLUX Inpainting workflow, you'll need to configure the DualCLIPLoader node. Here's how:
- For setups with lower memory, load the `sd3m/t5xxl_fp8_e4m3fn.safetensors`.
- For higher memory configurations, load the `sd3m/t5xxl_fp16.safetensors`.
Step 2: Configure Load Diffusion Model Node
Next, you'll need to configure the Load Diffusion Model node to align with your machine's capabilities:
- For medium-sized machines using RunComfy, set the checkpoint to `flux_schnell,fp8` and the clip to `t5_xxl_fp8`.
Following these steps will ensure that you effectively use the ComfyUI FLUX Inpainting workflow, allowing you to achieve impressive image editing results with the powerful FLUX models.


For RunComfy large-sized machines or above, use flux_dev,default with t5_xxl_fp16 for better performance.


Step 3: Configure VAELoader Node
Ensure the appropriate VAE model for FLUX is preloaded.
Step 4: Load and Mask the Image for Inpainting
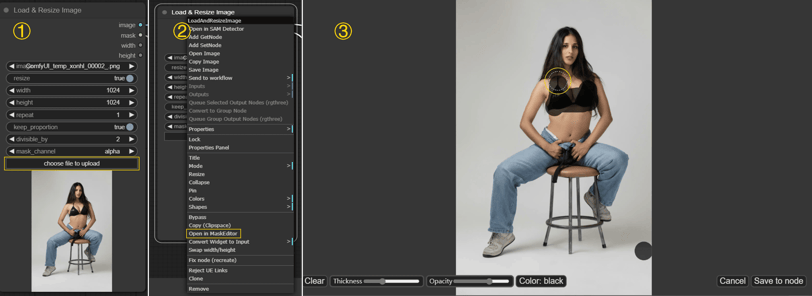
Load the image you want to transform with FLUX Inpainting. Right-click on the image and choose "Open in MaskEditor" to access the advanced masking tools. Use MaskEditor to precisely select the areas where you want to apply FLUX Inpainting.


Step 5: Set Up CLIPTextEncode Node
Enter your desired text prompt in the node's properties to guide the FLUX Inpainting process and achieve the desired outcome.
Step 6: Generate the Image
With everything configured, proceed to generate your image using FLUX Inpainting technology.
The ComfyUI FLUX Inpainting workflow is a powerful tool for enhancing images, making it an essential addition to any image editing toolkit. By leveraging FLUX Inpainting, you can easily achieve professional-quality results.
Click the image below to view the full workflow:


We are a non-profit community of AI enthusiasts and researchers dedicated to exploring and advancing the latest in generative AI technology. We are not affiliated with BlackForestLabs.ai
